If you’ve been anywhere near tech Twitter or AI communities lately, you’ve probably seen Clawdbot blowing up. The hype is real: people are calling it “the AI assistant we were promised years ago,” claiming it can do everything from managing your inbox to literally buying a car for you.
But here’s what nobody’s telling you: the installation process can be an absolute nightmare, especially if you’re not a command-line wizard. I spent hours wrestling with errors, missing dependencies, and cryptic failure messages before finally getting it running.
This guide documents my actual experience, including all the problems I encountered and how I fixed them. If you watched my YouTube video, this is the detailed walkthrough I promised.
🚨 CRITICAL WARNING: Do NOT Run This on Your Personal Computer
Before we go any further, let me be absolutely clear: Clawdbot gets deep access to your system. It can read files, execute commands, browse the web, and potentially access sensitive data. Running it directly on your personal machine with all your documents, photos, banking apps, and passwords is a security risk you don’t want to take.
For this guide, we’ll be setting up a Virtual Machine (VM) - essentially a computer inside your computer. This creates an isolated environment where Clawdbot can run without touching your personal data.
VPS Alternatives (If You Don’t Want to Use Your Own Hardware)
If you’d rather not use your local machine resources, here are some cloud VPS options:
- Hetzner - Great value, starting around €4/month (EU-based)
- Win-VPS- Starting at $2.95/month with good global locations
- Linode - Reliable option starting at $5/month
Pro tip: If using a VPS, make sure to add swap space if you only have 1GB RAM. I’ll cover this later.
Part 1: Setting Up VirtualBox and Windows 11 VM
Step 1: Download VirtualBox
- Go to https://www.virtualbox.org/wiki/Downloads
- Download the version for your operating system (Windows, macOS, or Linux)
- Run the installer and follow the prompts
- Also download the Extension Pack from the same page and install it after VirtualBox
Step 2: Download Windows 11 ISO
- Visit https://www.microsoft.com/software-download/windows11
- Scroll down to “Download Windows 11 Disk Image (ISO)”
- Select Windows 11 (multi-edition ISO) and click Download
- Choose your language and click Confirm
- Click the 64-bit Download button (this will be about 5-6GB)
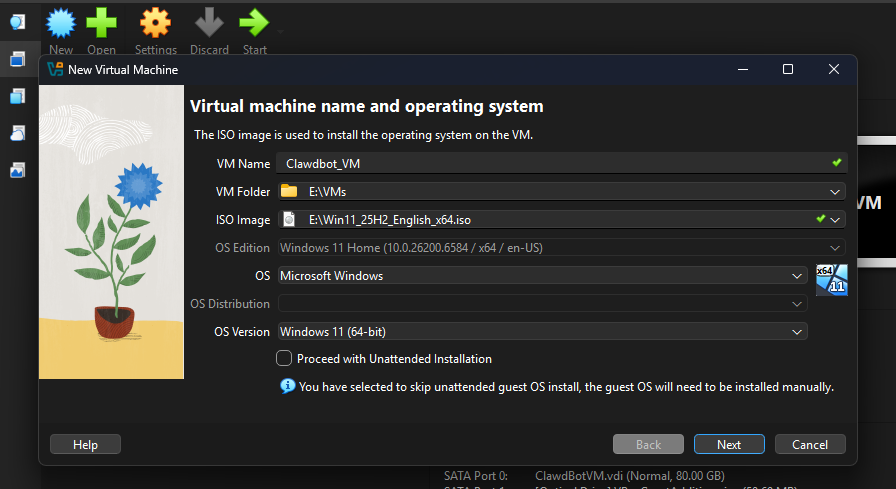
Step 3: Create the Virtual Machine
- Open VirtualBox and click “New”
- Name your VM (e.g., “Clawdbot-VM”)
- Select “Microsoft Windows” as Type and “Windows 11 (64-bit)” as Version
- Allocate at least 4GB RAM (8GB recommended if you have it to spare)
- Create a virtual hard disk - 50GB minimum (dynamically allocated is fine)
- Click “Create” to finish
⚠️ FIRST ERROR: The Black Screen Bug (VirtualBox CPU Core Issue)
This is where things first went wrong for me. I configured everything, attached the ISO, started the VM… and got a completely black screen. Nothing. The VM appeared to be running but showed absolutely nothing.
The Problem: VirtualBox 7.2+ has a known bug with Windows 11 and CPU core allocation. If you set an even number of CPU cores (2, 4, 6), Windows 11 may fail to boot and just show a black screen.
The Fix: Set your CPU cores to an ODD number. I set mine to 3 cores and it worked immediately.
How to fix it:
- With VM powered off, select it and click “Settings”
- Go to System → Processor
- Change CPU count to 3 (or 1 if your system is limited)
- Also go to Display → increase Video Memory to 128MB and enable 3D Acceleration
- Click OK and try starting the VM again

Part 2: Installing Windows 11 in the VM
Boot from ISO
Before starting the VM, you need to attach the Windows 11 ISO:
- Select your VM and click “Settings”
- Go to Storage → click the empty disk under “Controller: IDE”
- Click the disk icon on the right and “Choose a disk file”
- Select your downloaded Windows 11 ISO
- Click OK and start the VM
The Windows installer should now boot. Follow the standard installation process:
- Select language, time, and keyboard
- Click “Install now”
- When asked for a product key, click “I don’t have a product key” (you can activate later or use it unactivated)
- Select Windows 11 Pro (gives more flexibility)
- Accept license terms
- Choose “Custom: Install Windows only” (not upgrade)
- Select the unallocated space and click Next
Bypassing Microsoft Account Requirement (Creating Offline Account)
After Windows installs and restarts, you’ll hit the OOBE (Out-of-Box Experience) setup. Microsoft really wants you to sign in with a Microsoft account. But for a throwaway VM, you want a local offline account.
Here’s the bypass method that still works:
- When you reach the “Let’s connect you to a network” screen…
- Press Shift + F10 to open Command Prompt
- Type:
OOBE\BYPASSNROand press Enter - The system will restart and return to the network screen
- Now you’ll see “I don’t have internet” option - click it
- Click “Continue with limited setup”
- Create your local username and password
Note: If
OOBE\BYPASSNROdoesn’t work (Microsoft is slowly removing this), you can alternatively try pressing Shift+F10 and typing:reg add HKLM\SOFTWARE\Microsoft\Windows\CurrentVersion\OOBE /v BypassNRO /t REG_DWORD /d 1 /ffollowed by:
shutdown /r /t 0
Once Windows setup completes, connect to the internet through VirtualBox’s network settings.
Part 3: Installing Clawdbot (Where the Real Fun Begins)
Now for the main event. According to Clawdbot’s official docs, installation should be as simple as running a one-liner in PowerShell. Spoiler: it wasn’t that simple for me.
The “Official” Installation Method
Open PowerShell as Administrator and run:
iwr -useb https://clawd.bot/install.ps1 | iex
In theory, this downloads and runs the installer. In practice, I hit error after error because of missing dependencies.
⚠️ DEPENDENCY ERRORS: What You Need to Install First
The Clawdbot installer assumes you have Node.js and Git installed. A fresh Windows 11 VM has neither. Here’s what you need:
1. Install Node.js
- Go to https://nodejs.org/
- Download the LTS version (recommended)
- Run the installer, accept defaults
- IMPORTANT: Check the box that says “Automatically install necessary tools” during installation
- Restart PowerShell after installation
Verify installation by running:
node --version
npm --version
2. Install Git
- Go to https://git-scm.com/download/win
- Download the 64-bit installer
- Run installer - you can accept most defaults
- Make sure “Git from the command line” is selected
Verify by running:
git --version
3. Retry Clawdbot Installation
With Node.js and Git installed, restart PowerShell (as Administrator) and run the installer again:
iwr -useb https://clawd.bot/install.ps1 | iex
This time it should start downloading packages. The process takes a while - don’t panic if it seems stuck.
⚠️ ANOTHER ERROR: ‘clawdbot’ Command Not Found
After installation completed, I tried running clawdbot and got “command not found” or “not recognized” errors. This happened because the installation path wasn’t added to the system PATH correctly.
Workaround Solutions:
Option A: Run from the installation directory
Navigate to where Clawdbot was installed (usually in your user profile) and run it directly:
cd $env:USERPROFILE\.clawdbot
.\clawdbot.cmd
Option B: Add to PATH manually
- Press Windows key, search “Environment Variables”
- Click “Environment Variables” button
- Under User variables, find “Path” and click Edit
- Add the Clawdbot installation directory
- Restart PowerShell
Option C: Use npm global install (alternative method)
npm install -g clawdbot@latest
clawdbot onboard --install-daemon
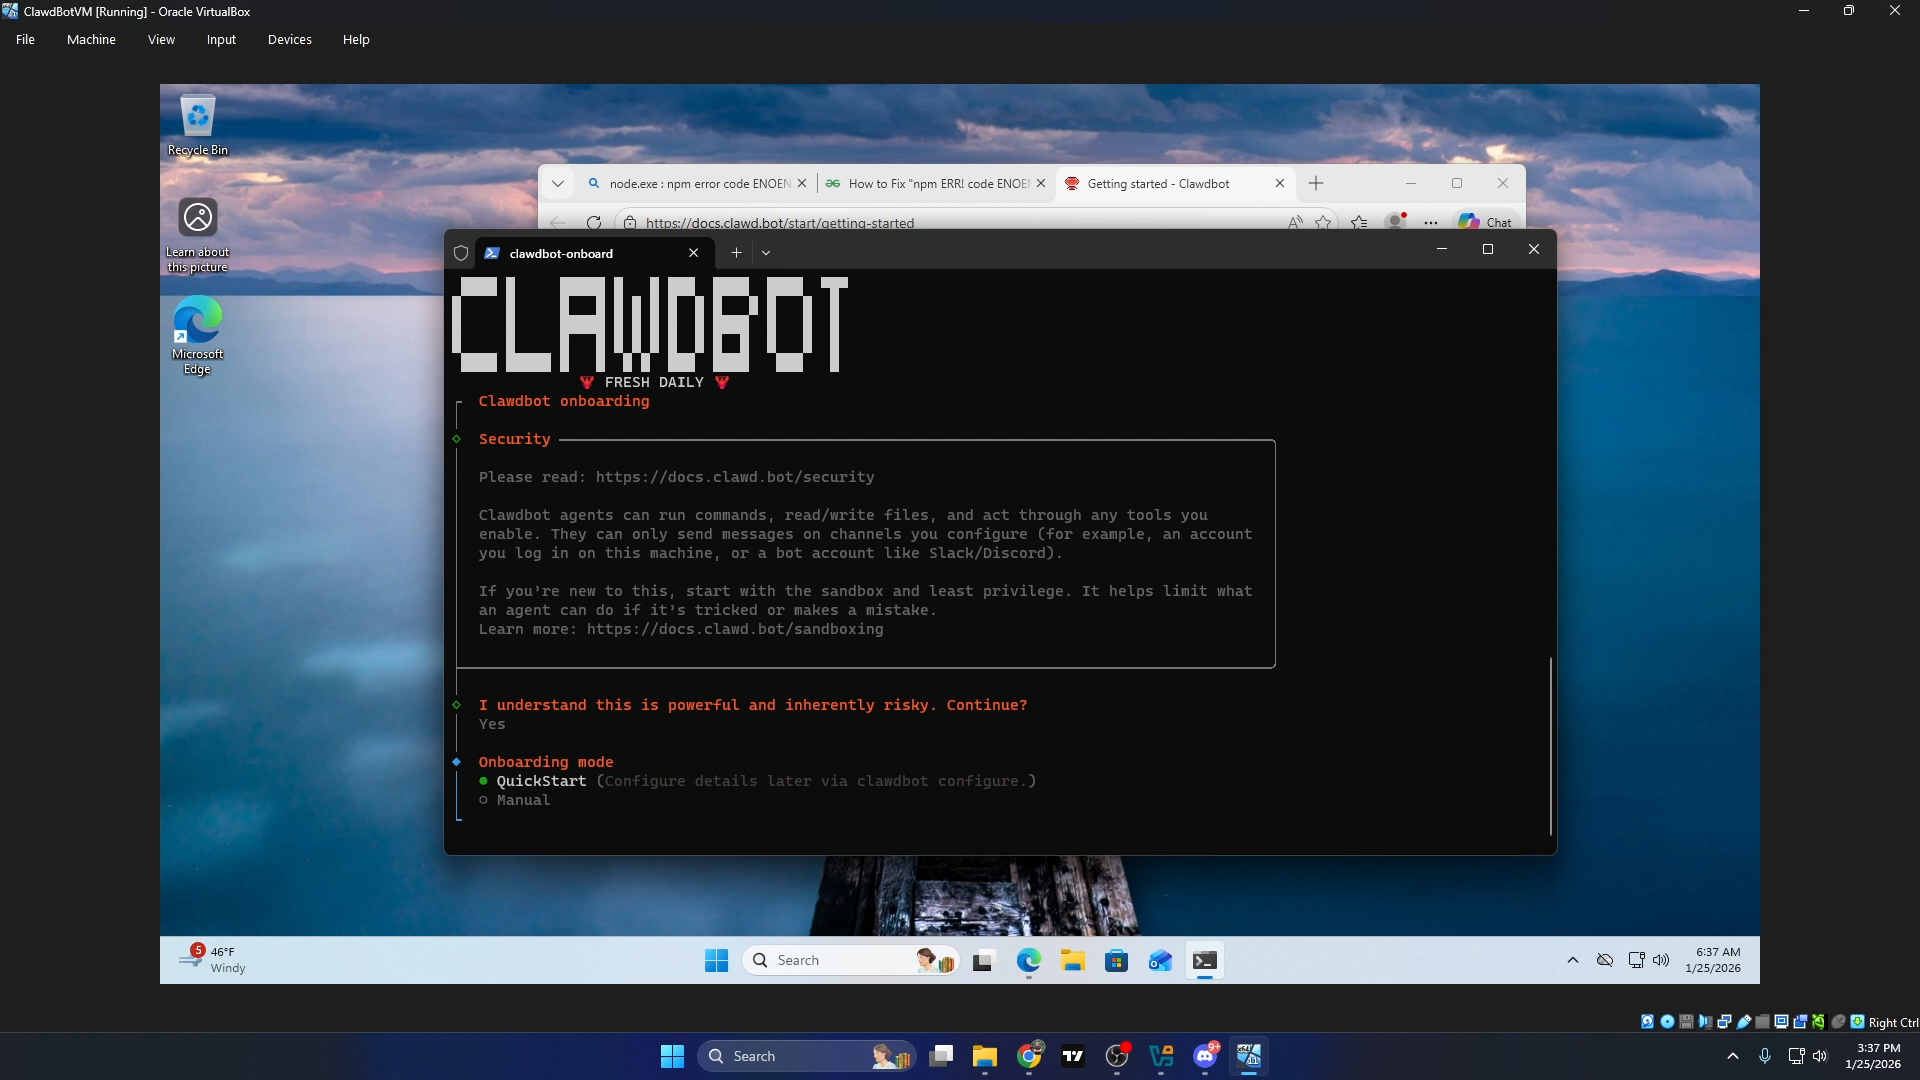
Part 4: Running the Onboarding Wizard
Once you can actually run Clawdbot, start the setup wizard:
clawdbot onboard
The wizard will walk you through:
- LLM Provider Selection - Choose Anthropic Claude (recommended), OpenAI, or local models
- API Key Configuration - You’ll need API keys for whichever AI service you choose
- Channel Setup - Connect to WhatsApp, Telegram, Discord, etc. (optional)
- Skills Installation - Choose which capabilities to enable
- Gateway Service - Install as background service
Getting Your API Keys
For Anthropic Claude (recommended):
- Go to https://console.anthropic.com/
- Create an account or sign in
- Navigate to API Keys section
- Create a new API key and copy it
- Add billing information (you’ll pay per token used)
For OpenAI:
- Go to https://platform.openai.com/
- Create account and set up billing
- Generate API key from the API Keys page
My Honest Assessment: Is Clawdbot Worth the Hype?
After all that setup pain, does Clawdbot actually deliver? Here’s my honest take:
✅ What’s Actually Good:
- Persistent memory - Unlike ChatGPT, it actually remembers context across sessions
- Multi-channel access - Being able to message it from WhatsApp/Telegram is genuinely useful
- Local-first approach - Your data stays on your machine
- Extensible skills - The community is building interesting integrations
❌ What’s Not So Great:
- Installation is rough - The documentation assumes technical knowledge that many users don’t have
- API costs add up - One user reported burning 180M tokens in a week. That’s not cheap.
- Windows support feels secondary - The docs recommend WSL2 for Windows, suggesting native Windows is “untested and problematic”
- Requires always-on hardware - Many users are buying dedicated Mac Minis just to run this
- Security concerns - It has deep system access - a compromised skill could be dangerous
Bottom Line:
Clawdbot is impressive and the concept is solid. But it’s still very much a power-user/developer tool. The Twitter hype makes it sound like plug-and-play magic. The reality is hours of setup, ongoing API costs, and the need for dedicated hardware if you want it running 24/7.
If you’re technical and want a genuinely personalized AI assistant, it’s worth trying. If you just want ChatGPT that remembers you, the new Claude Pro features might be a simpler option.
Quick Troubleshooting Reference
| Problem | Solution |
|---|---|
| Black screen on VM boot | Set CPU cores to odd number (1 or 3) |
| Installation fails immediately | Install Node.js and Git first |
| ‘clawdbot’ command not found | Run from installation directory or add to PATH |
| Out of memory errors (VPS) | Add swap space: sudo fallocate -l 2G /swapfile |
| Gateway health check fails | Check if port 18789 is available, restart gateway service |
| Skills not loading | Run clawdbot doctor to diagnose issues |
That’s the full walkthrough. If you found this helpful, check out the video on my YouTube channel for the visual walkthrough. Drop a comment if you hit any issues I didn’t cover.
Stay tuned for more B2B tools reviews and tutorials.
—
VibeMoonies